What message is the looped sash worn at the king’s waist meant to convey? Why is it almost always painted red, and what meaning does that facet add to the inherent significance of the sash itself?
The previous posts in this four-part series (the first discussing sashes in general and the usage of this regalia element in Ramesside royal tombs and the second focused on the meanings of the color red in ancient Egypt) have suggested a range of possible implications for the red looped sash. The associations of the color with the aggressive Eyes of Re and the morning and evening ordeals of the solar god, when he passed through the dangerous liminal zone, connect this attribute to a powerful form of apotropaic protection. The similarity of the looped red sash to the girdle ties worn by goddesses and queens, combined with the connection between both types of ties and the tyet and ankh, suggests that this ritual knot was not only protective but also contained significant creative potential. It is also quite likely that the particular meaning inherent in the red looped sash may vary considerably depending upon the king’s context.
There are 72 examples of the looped sash appearing at the memorial temple of Ramses III at Medinet Habu. They appear in all areas of the temple and in a variety of scene types, as summarized by the pie chart below.


Before delving into their appearances at Medinet Habu, a brief survey of some earlier examples of this regalia element (beyond those in Ramesside royal tombs discussed in the first part of this investigation) seems useful.
The looped sash appears on Tutankhamun on a few occasions, including the ostrich hunt depicted on a sunshade found in his tomb (JE 62001).
Tutankhamun hunting ostriches, detail (from T.G.H. James, Tutankhamun):

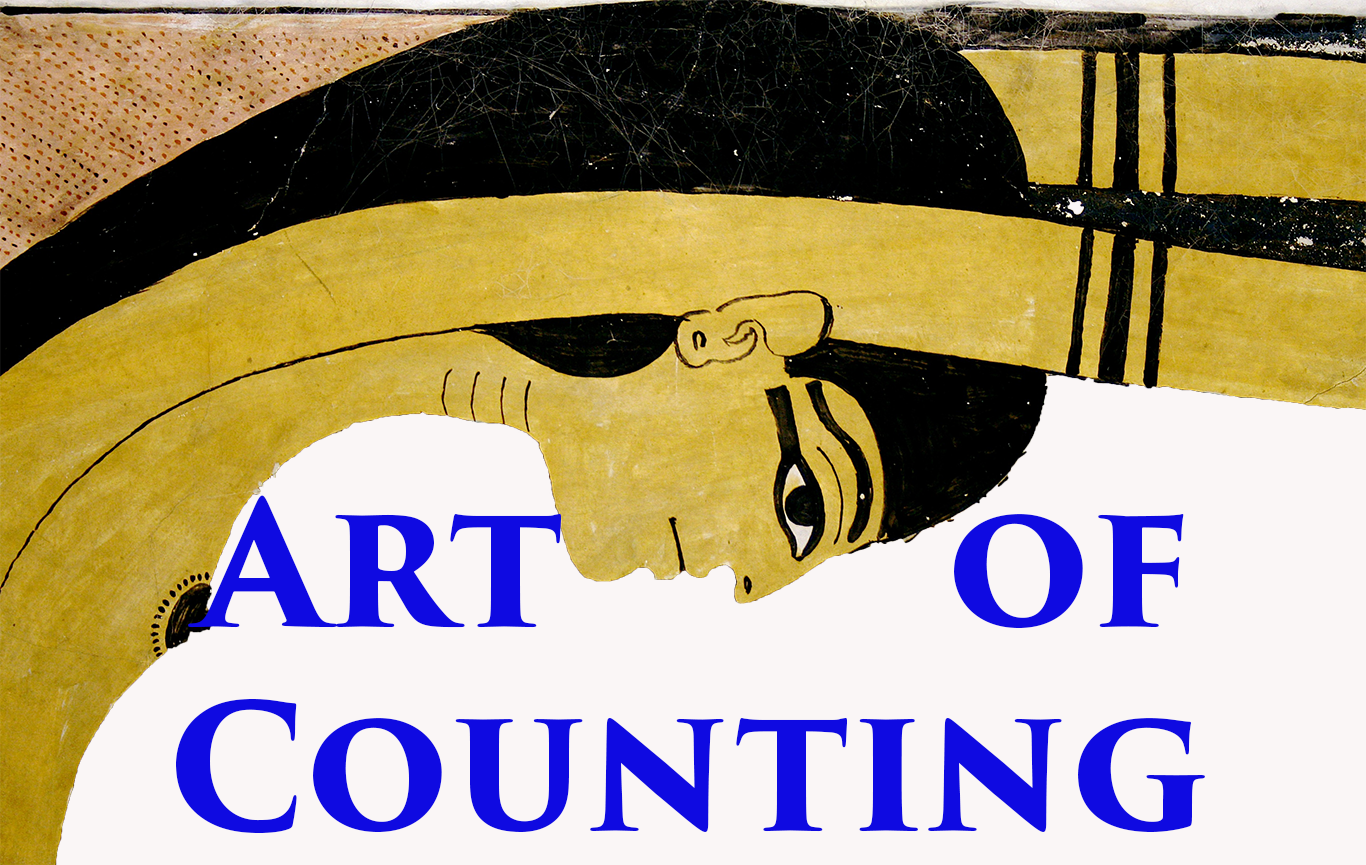
A very interesting appearance on Tutankhamun is found on the large image of the king being suckled by Weret-hekau (‘Great of Magic’) that was found inside the small golden shrine (JE 61952). The king also wears sandals in this depiction where he receives sustenance from the goddess, infusing his body with power and divine authority.
Tutankhamun suckled by Weret-Hekau, detail (from T.G.H. James, Tutankhamun):

The looped sash is worn at least 15 times in the interior of the Seti I temple at Abydos (see the first installment of this discussion for several images). It appears in a prominent scene on the south wall of the chapel dedicated to Seti where the king is being crowned, and it is also worn by the king three times within the Osiris complex. The majority of the scenes where the looped sash appears are found in the hypostyle hall, including a relief showing Seti receiving staffs from Sakhmet and seven column scenes, five of which show him presenting Ma’at. The looped sash and lappet wig are worn together on several occasions, including a large scene on the north wall of the hypostyle hall where the king kneels and receives the crook and flail, one where he receives life from Isis, and one where a menat is extended to him by Mut while he grasps a rekhyt bird (and see here for a summary of a recent examination of the rekhyt bird by Ken Griffin).
The looped sash seems particularly related to violent actions. A stela in Cairo (JE 46189) shows Ramses II grasping captives while wearing a khepresh crown with the looped sash and sandals. It is very interesting to note in this example that only the trailing sash is rendered in relief while the loop is applied solely in paint.
Ramses II grasping foes:

Other violent images come from the king’s temple at Abu Simbel and from the open courtyard of his temple at Beit el-Wali. In one relief at Beit el Wali (OINE 1, pl. 11), Ramses II wears the pointed ‘Nubian’ wig, looped sash, and sandals as he grasps prisoners. The looped sash also appears in two other slaughter scenes in this section of the temple (pls. 8 and 12). Within the temple, the looped sash and sandals appear in a prominent offering scene that encompasses the entire north wall of the columned hall. This scene shows the king presenting wine and an overflowing table to Khnum and Satis (pl. 30). In the parallel scene on the south wall, where Ramses presents incense and a libation to Horus and Isis, he again wears sandals but the looped sash is absent. This same type of juxtaposition is noted inside the sanctuary as well. On the east wall flanking the doorway, the king is shown being suckled by Anukis on the north side and Isis on the south (pl. 41 a&b). Sandals again appear in both, but the looped sash is present only in the scene where the king receives sustenance from Isis.
A series of scenes Ramses II carved on the exterior of the Karnak enclosure wall built by Thutmosis III provide an interesting view into the use of the looped sash (Sincere thanks to Dr. Peter Brand for allowing access to his photographs of this monument).
Karnak exterior enclosure wall, south side:

On the north face of the wall, the sash appears in approximately 1/3 of the reliefs. The vast majority of these scenes depict the king presenting an offering, and the types vary greatly, but it is of note that the scenes where the looped sash appears often show the king presenting incense, ointment, or bouquets. The sash is worn almost half the time with the khepresh crown (the lappet wig does not appear at all), but it also appears with many other crowns. The looped sash is chosen for the only scene in the series of the king being purified (combined with the round wig and seshed), the only scene where he is shown being led, and for a depiction of the king receiving the crook and flail while he holds a rekhyt bird. Considering how regularly it occurs on this face of the wall, it is notable that on the east face (the back of the temple) the looped sash is completely absent.
Appearances of the red looped sash at Medinet Habu
The looped sash appears 72 times throughout the temple:
- 18 scenes of the king presenting an offering
- 16 smiting scenes
- 12 reliefs showing the king processing
- 11 depictions of ritual action
- 8 scenes of battle slaughter
- 7 instances where the king stands in a balustrade and/or is presented with battle spoil.
Smiting on main face of the Window of Appearance in the first courtyard:

Smiting scenes on columns in front of Window of Appearance:

Smiting on the palace side of the Window of Appearance:

Slaughter scene on exterior wall:

Slaughter scene in second courtyard:

Detail of king’s costume in slaughter scene in second courtyard:

Presented with battle spoil in the first courtyard:

Detail of king in presentation scene:

The 18 offering scenes include five incense presentations and three scenes each where the king offers prisoners, Ma’at (or a rebus of the king’s name), or bouquets to the gods.
Offering incense and libation to Amun-Re:

Presenting prisoners to Amun and Mut:

Presenting prisoners on the East High Gate:

Offering a rebus of the king’s name styled as Ma’at:

One of the offering reliefs shows him presenting a sphinx-shaped ointment jar, one is too damaged to determine what the king presented, and the last preserves an unusual depiction of the king slaughtering a small ibex.
Offering ointment:

Of the 12 processing scenes, one is a triumphant return from a military campaign, one is found in a portal leading from the palace through the south wall of the first courtyard, and four are the large-scale depictions of the king found in the corners of the first courtyard.
Triumphant return in the second courtyard:

Detail of the triumphant return showing painted looped sash:

Procession in the southwest corner of the first courtyard:

Procession in the southeast corner of the first courtyard:

Procession in the northeast corner of the first courtyard:

Procession in the northwest corner of the first courtyard:

The remaining six all show the king being led by various gods into the presence of Amun-Re to be crowned and receive emblems of kingship.
Ramses being led by Montu:

Detail of king’s costume:

Eleven of the scenes are considered ‘ritual’. Two are the unusual inlaid reliefs found flanking the portal into the temple proper, while a third (probably originally also part of a pair) depiction of the king is found directed towards an opening in the East High Gate.
Inlaid relief to south of portal into the temple proper:

Detail of king’s apron and loop:

Four ‘ritual’ scenes show Ramses praising the rising sun bark or show him reciting hymns before Khepri or Osiris.
Ramses praising the ascendant Khepri in a room between the towers inside first pylon:

The remaining four scenes all show the pharaoh receiving emblems of kingship or his commission to carry out a military campaign.
Statistical methods have been applied to the data from Medinet Habu in an effort to clarify the usage patterns for this enigmatic element of regalia. The table below summarizes the strong positive and negative tetrachoric correlation results for the looped sash. Keep in mind that correlations +0.50 are ‘interesting’ and those +0.80 are statistically significant.

The tetrachoric correlation results above reveal that the strongest negative connections are with the three ‘landscrowns’ (deshret, hedjet, and sehemty), the khat headdress, and the shendjet kilt. From looking at the reliefs, all of these could be expected, although the negative relationship with the landscrowns and shendjet is more immediately understood (the looped sash never appears with the shendjet in the current dataset and the landscrowns almost always do). Why exactly the khat has such a strong negative connection with the sash is more obscure at this point.
Ramses wearing a khat (embellished with a falcon) in the tomb of one of his sons (QV 44):

The less significant negative connections between the looped sash and the other headgear are a reflection of the fact that it does appear, albeit rarely, with them. The looped sash also appears to not be selected for scenes showing the king seated. The looped sash rarely appears in conjunction with a divine presence or for those scenes where the king is presenting an offering.
At the positive end of the spectrum, the tetrachoric results reinforce the strong connections between the looped sash and smiting scenes, including several attributes related with scenes of this type, like the ‘Strong-Armed Horus’ title and controlled (i.e. grasped in the hand or crushed underfoot vs. bound) foes. The looped sash is very strongly connected to scenes of the king in a balustrade, including those where he is offered spoil. It seems that the khu-fan appears slightly more often in conjunction with this attribute than the sunshade does.
Frequency analysis highlights many of the same patterns and also brings out the occurrences of other regalia with the looped sash at Medinet Habu. These results are summarized below in two pie charts, one focused on headgear and the other on the remainder of the king’s costume.


Additional frequency analysis quickly identified the occurrences of the looped sash with the various elements that appear in the king’s immediate context, such as items held in the king’s hand, the appearance of sunshades or khu-fans, the royal ka following behind the king, and the different divine emblems that hover over his head. These are summarized below in a column chart.

A survey of the Medinet Habu complex has revealed that the sash retains an apotropaic significance throughout the temple. Recent examination of the relief program of the East High Gate has noted the strong presence of deities related to the angry Eye (D. O’Connor, forthcoming).
East High Gate:

Particularly with this close association, the occurrences of the looped sash on the Gate help support a conclusion that the regalia item was intended to signify aggressive protection. Not only does the looped sash appear on the east face of both towers, on the massive images of pharaoh smiting enemies, but it occurs in six scenes in the passage of the Gate. Especially considering how often it appears on the Gate in general, the fact that the looped sash is completely absent from the west face of the structure is striking.
Within the first pylon, a similar pattern to that seen on the Gate is evident.
First pylon exterior:

In the room between the towers, Ramses is depicted several times adoring the rising and setting sun (see image above). What is most interesting for this discussion is that the loop is evident in MH 430A, 431A, and 433, all of which show the king praising the rising solar bark. The looped sash is again conspicuously absent from the parallel scenes of the king praising the setting sun.
Other appearances of the looped sash within the temple suggest that this attribute, with its apotropaic connotation, was considered particularly appropriate for liminal or transitional zones. For instance, it appears in several scenes that depict the king being led to the Theban Triad for coronation, the ceremony that ‘transforms’ the living individual into the icon of kingship.
Ramses being led to the Theban Triad:

It also appears in an unusual scene where Ramses offers to an apparently living form of Osiris, on the south wall of the western portico (MH 277A). Particularly since the god, who bears the title ‘Lord of Eternity,’ wears the shwty crown rather than his usual atef, it could be suggested that this scene also depicts a transition of power, from the god to the newly-deceased pharaoh. Ramses, who offers incense and a libation, wears a nemes alone—this is the only depiction in the outer parts of the temple where the looped sash and unadorned nemes are worn together. The king’s finger extends and crosses the was staff held out by Osiris, perhaps visually signaling an assumption of the right to rule over the Netherworld.
Ramses offering to Osiris in the second courtyard:

In addition to the 72 examples found in the wall reliefs, the seven royal columns in the first courtyard wear the looped red sash as part of their elaborate costume.
Anthropomorphic columns in first courtyard:

Detail of king’s kilt:

These figures showed the vigorous king wearing complex emblematic headgear which spelled out the king’s name and identified him as ‘Beloved of Amun.’ An inscription on the base of one of these images refers to them as “the sovereign, beautiful as king on the throne of Atum and wearing the atef like Re-Horakhty.”
These images may represent the king as embodiment of both djet (linear time), with their association with Atum, and nehh (cyclical time), since they appear “like” the sun god. If so, these engaged statues could combine the seminal regalia that simultaneously identified the king as the vital, living pharaoh, the holder of the ka of kingship, the regenerated solar god who brings life to Egypt and burns the bodies of her foes, the rejuvenated Lord of the Netherworld, and the legitimate ruler of the cosmos whose actions maintain the proper functioning of both the terrestrial and celestial realms.
The statistical analyses performed on the looped sash showed that this attribute is strongly connected to battle cycle scenes, particularly those related to slaughter and triumph. The looped sash appears on images of the king as the apparently living pharaoh, raging in battle like Seth or Sakhmet when an apotropaic shield would be vital. Although much of the time it appears in the presence of humans, there are a number of instances where only the gods are present.

So, the looped sash appears often in violent scenes of slaughter or smiting, but it is also included in several offering scenes. Directed searches performed in the database additionally revealed that the looped sash was chosen very often for a particular type of scene; those that show him being led by deities into the presence of other gods to receive emblems of kingship. These scenes represent moments where the king is in a transitional zone. Like the Litany reliefs in the royal tombs (discussed in the first post on this topic), the pharaoh in these depictions is in a dangerous position, bridging the gap between the terrestrial and divine. These contexts can be interpreted as liminal zones, places or states that were generally viewed as being undefined and, thus, unpredictable. This special connection between the sash and liminal zones may help explain the unusual inclusion of the looped element in the scene of Ramses presenting an offering to a living form of Osiris as well as its appearance in the costume of the king in the inlaid images that flank the portal in the third pylon since they represent a point of transition.
What can these occurrences of the red looped sash at Medinet Habu tell us about the specific significance of this enigmatic element of royal regalia? The general patterns of usage revealed by the statistical analyses are clear, but not totally straight-forward. To more fully understand the particular meaning that this attribute imparted, it is necessary to look closer at a select group of examples–the large-scale scenes of the processing king found in the corners of the first courtyard. These icons of kingship, which analysis indicates were specially constructed for this context, will aid our comprehension of the red looped sash by examining the reasons that it was considered to be appropriate in these unusual images of pharaoh.
Our next installment will discuss these four reliefs and bring all the threads from the previous posts together. Through this effort, the Art of Counting will be able to present a quantifiably supported thesis for the significance of the red looped sash. Don’t miss it!
